ENGLISH –
What is broken?
Well, Broken is actually nothing. It’s just a little thing called “mirror brake”. As the name suggests, so that the movement of the oscillating mirror is decelerated. This has the advantage that transmit less vibration to the camera and the mirror strikes not so hard on the lower limiter, (above was supposed to be a foam lip). The mirror will also thank with constant adjustment. Thus, the brake damps the oscillating mirror speed by diverting motion into heat through friction. That should go silently by themselves with adequate lubrication. But this diminishes with time, so that 1. the mechanism squeaks and 2. the oscillation process is slowed unötig long.
The way, is only about 5 mm in size and is located above a little left from the corner of the Black plastic under the model designation immediately behind the pod shell. All what you have to do is a Tröfpchen oil at this point plazieren.Das wars.Nun quite so simple the matter is not a course made because the point is not readily available.
What do I need to repair?
You need patience and some time apart is not much:
– A syringe with cannula (pharmacy or your friendly neighborhood doctor). My needle is above light yellow (defines the size), just 0.91mm thick and 37mm long (metal cannula from the plastic piece from measured). Thinner and longer but it can not hurt.
– Good lubricating oil (only gaanz little)
* Can you maybe get a gun oil of covenant? If not tuts also something else. However, it must be acid-free and definitely must not gum up-a small Phillips screwdriver
That`s it!
Repair
The oil:
The lubricant should be as highly viscous (otherwise it everywhere distributed and less spin is fixed) and acid free. It is supposed to be to produce friction since a certain resistance. Penetrating or not suitable, because they evaporate over time (to high petroleum content) and can be deposited in places where they can not use überhaubt.Etc. There was no way I WD40, Karamba spray into the camera. This is certain death!
I took gun oil from the Bundeswehr. That will not evaporate determined in hot times and has a pretty good quality. Caution: the reddish-colored oil is a penetrating oil.
The material:
– A (disposable) syringe
– A suitable needle
– Smaller cross Schaub Dreher for baseplate
– A few drops of oil
And there you go:
1. marked on the needle at the top of the flattened side of the peak
2. Take the Baterie out
3. urges the camera
4. Take you now the syringe. Pull up on the cannula only as much oil into it, this can only be a drop of oil coming out of the needle when complete emptying. With a little practice it goes.
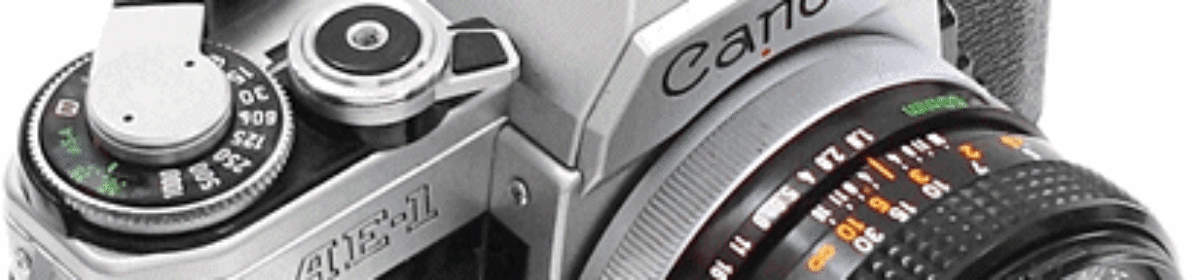
5. unscrews the bottom plate of the camera. These are the small Phillips screws on the left of the winds receptacle and right below the four electrical contacts (AE-1, A-1). The AE-1 program has additionally still be centered a screw.
6.Nehmt from the base plate. Possibly have you or similar to the handle Schaub Dreher once gently tap around it. Do not worry it falling when removing the panel determines not accept parts.
7. Take the camera in your left hand. Ground up and lens flange to the body Hinz eigend. A Bolt-50mm lens facilitates handling.
8. Set the needle to the right corner of a lens to, the lens body Hinz eigend. Rotates the flattened side of the tip toward you. This is important so that you can slide better on the components along with the needle. I have broken down times for testing a faulty AE-1. Check out the pictures in peace.
Look there times exactly in the camera. You can recognize as a small gear made of brass. So about halfway housing depth. To the left of the needle must go.
Pushes the needle approximately 2.5 mm to the right of the beveled edge of the lens mount vertically between the flange and the housing wall in the camera. After about 4-5 mm you notice a resistance. With slight force, the needle should continue pushing leave (possibly often fix). Pushes the needle clean until it stops.
The needle is now on the gear.
Now pulls the needle back out 1cm. Rotates the flat side of the needle tip to the left.Angling them slightly to the left (top) and puts them through to the end of the needle.
The needle tip is now directly over the brake. Rotates the opening to the right and point the camera like this. that the needle is vertical. The needle is now firmly clamped on all 4 sides and can no longer move (check). The flat side of the tip comes back to the right so that the oil can conveniently hit the brake. Suppresses the syringe is empty (one drop). Pulls out the needle again. Leave the camera on the head. Baterie insert (screw together can you later) and trigger. Na success?
If yes: soil and tighten the camera upside down a few times to trigger (as 30-40 times, it may be already). Leave runs for 10 minutes around and ferti g. Congratulations. Was it easier than expected … right?
If not, raise the camera a few times and try. If that is not successful stretch, battery out and try again with the lubrication. Do not despair. In my AE-1 it worked only the third time. But be careful with the oil. Not too much into the case. Better to leave it 24 hours, so that the soup distributed something and then have a go. I think 5 attempts should not hurt.